
Finally, for those of you nine readers (and that is most likely an
exaggeration) who have been anxiously awaiting pictures of the basement
progress, I now present to you the bathroom. I had originally thought I would
show the entire basement in one long post, but I figure why not give the
basement the credit it is due. I mean, we have been working at it for over a
year now and Parker does think he lives at Home Depot.
So here is what the bathroom looked like when we moved in. I almost
don’t want to show this picture because it is so ugly, but it helps to see what
we were working with.

Sadly, this was only picture I could find. Yes, that is it, a tiny dark hole with no windows in the corner of an unfinished basement. We knew right away that the only thing that would stay would be…..well, nothing. It was hideous and had to go.
When planning the basement layout the, we decided that we would keep the
bathroom in its current location, allowing us to utilize the existing plumbing,
however we would enlarge the space to encompass an existing
window. You can see in the ‘before’ picture the window just outside the bathroom
wall and the beam line. Our new sink would now be centered on that window and
the beam line is now were a wall resides, separating the bathroom and one
bedroom from the living space and office area.
So here it is now…

TAA DAA!!! If you remember a while ago I posted a concept board for what the space would look like, and I am happy to say that I feel like it came close to how I envisioned it. Although, there is still more decorating to do, the bones of it are there.
For me, deciding on the materials and paint colors is always so much
fun. I knew for the basement I wanted to keep gray as the neutral and brighten
everything else up with white. Pops of color will be brought in later with
accessories and art, that way I can easily switch things if my tastes change. As for the countertops, I had originally
wanted to use a carrera marble, however after receiving numerous quotes over $1,000.00,
Sage convinced me he was up to the challenge of making concrete countertops. Overall,
this countertop cost us maybe a $100, and I love it. Luckily, Sage is a perfectionist and the countertops came out just like him - perfect! He is pretty much the
best.

A couple other things I love about this space:
The faucet: It is awesome. If you have ever looked for faucets with any
design appeal, you know how expensive they can be. This one cost us 10 bucks at
The ReStore and I love it (I
think the fact that it was only $10 takes my love for it to a new level).
The light fixture: This was a toughie. Because we have low ceilings, we
really couldn’t do a pendant fixture and sconces wouldn’t work because we did
not have the room on the sides. I found this light from Schoolhouse Electric and knew
this would be great. It was a little bit of a splurge but still reasonable. And
because the light bulb is exposed, I knew I had to use something with interest.
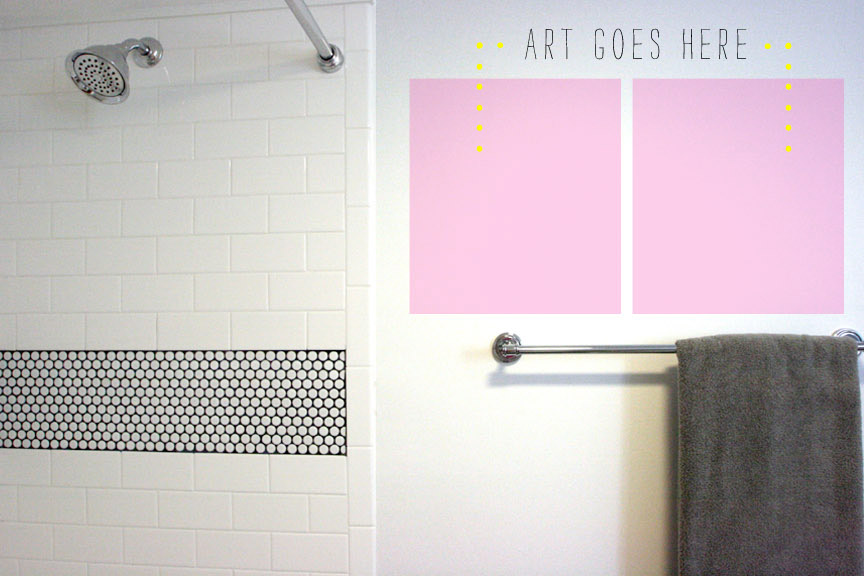
The
Tile: Subway and penny tiles. In my opinion, these two tiles will never go out
if style. I was a little scared going with the black grout, but it turned out
okay…Not the best. And if you ask me if I would ever do it again, I might say
no. This was hard to install with matte white penny tiles, and there was a
moment when I thought we might have to rip it all out because the black grout
had stained my precious pennies. Thanks to vinegar and water, the tiles were
saved, but I almost had a panic attack. What did we ever do in the days before
we could Google things like, ‘getting black grout off white penny tiles?


Finally, it is time to style the space, and while I love adding the finishing touches, this is always so difficult for me. Anyone who knows me well, knows I have a hard time spending money. Yes, I have a plan in place for the things I think will complete the room, but buying them may take me awhile. Anyhow, below are a few things I would like to add, the mirror being the most important I suppose.

So there it is, folks, the
bathroom. Part 1 of the basement progress. Sorry, dear nine readers, for such a long post. I usually try to avoid writing
anything of great length since my writing skills are nonexistent, however there
was so much time, thought and hard work put into this space, that I just couldn’t stop
typing.
Now come visit us! We have a bathroom you can use.
Wow, this looks incredible! Well done, you three!
ReplyDeleteI thoroughly enjoyed this post and loved your blog tour of the bathroom. Beautiful work you two, a great team you ans sage are.
ReplyDeleteThis bathroom is awesome! And your choice of black grout in a bathroom is genius! It may have been hard to install, but now it starts as black and doesn't slowly evolve to black! Love it!
ReplyDeleteGreat job!! I’m glad you didn’t give up on your penny tile, they look great and really pop with the black grout! I am in the process of figuring out tile for my bathroom and I’m leaning toward the penny tile with black grout as well (might use a polished penny though..maybe easier with potential black grout staining??). I have to tell you that of all of the hundreds of pics of penny tile that I have looked at, yours is my favorite! I just love how the white pennies pop and how the black grout is somehow so visible (particularly on the band of your shower wall). Could you please tell me what tiles you used? It appears as if your pennies are more separated allowing more of the black grout to be visible?? Did you recess the grout so that the pennies appear to pop more? I would love to hear your advice. Thanks so much:)
ReplyDelete